I really love the look of some of the distressed framed mirrors out there. Pottery Barn has quite a few that I occasionally torture myself by browsing through.....
| Pottery Barn Aegean Mirror |
It was listed as a mirror that had been removed from a dresser. It was made out of particle board and looked very cheap in person. But......(you knew that was coming, didn't ya?) I liked the size of the mirror and figured on it being a great DIY project.
Soooooo the other night, armed with some scary looking tools, I pulled it out and started to take it apart. First thing that needed to go was the cheesy moulding on the top and bottom. It was sort of scalloped and looked like plastic.
 |
| Tapped (not gently) on the underside to lift the cross piece. |
 | ||
| Next, jammed a flat head screw driver in there to create a space. |
 |
| Moved across the top to loosen the moulding. |
It popped off pretty easily (phew) and I moved on to removing all of the small brad nails that were sticking out.
After all was said and done, I was left with a piece of mirror glued onto a base of particle board......not very appealing. My first thought was to use some thick moulding and create a frame. Then I started reminiscing about the distressed frames I have been
 |
| Nekked! |
 |
| Layering pieces of ripped down pine. |
After describing what I "saw" for this mirror, the Hubs very patiently started layering wood with me until it started to come together.
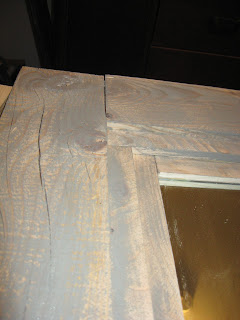
I was interested in a very raw look for the wood, so I purposefully chose "blemished" pieces. I think I am in love with the imperfections in this piece. After arranging and re-arranging, it looked perfect and we began gluing the base pieces. Layer by layer, we added a thick coat of Titebond beneath each piece of wood for extra strength and stability.
Once the last layer of wood was attached via glue, we went back over the entire piece with a small nailer to make double sure nothing was going to move!
 |
| The Hubs makes a great hand model, eh? |
In order to achieve the grainy effect, I wiped the excess paint off of the brush before applying it to the wood. Two light coats in this manner and I was left with The Beast exactly how I envisioned her!
 |
| Before |
 |
| After |
So for now she will rest comfortably in our walk in closet until she is hoisted onto the wall in Bray's room! Love it!
UPDATE! The Beast has finally made it into the new and improved Big Boy Room! Here she is!
Currently linking up with:


I love this! It looks so expensive. What was the total cost of the project?
ReplyDeleteThanks!! Actually (I should have put this in the post) the mirror was $10 and the wood came from scrap pieces leftover from other projects, specifically Bray's sandbox. The paint was a $0.50 sample container someone left behind at Lowe's. So all in all, around $11! I know at our Lowe's they have buckets with odd cuts of wood that are marked down. You could easily do this with pieces from there too!
ReplyDeleteThis is awesome!
ReplyDeleteYou've got great talent! I just wish I had more walls for more wall art and Mirrors. I have a huge obsession with mirrors.
Love the new look of the mirror! Thanks for sharing this at the Creative Bloggers' Party & Hop.
ReplyDelete