Since the wall was already primed and painted, I only had to fill and repair some holes in the wall from previously hung pictures. Filling holes and removing any trace of them is sort of an art form in itself. I have the distinct pleasure of learning a lot of better ways to do things....in contrast with my previous attitude of slap on the plaster, sand and accept the slight bump on the wall! To start, make sure that the sides of the hole lie flat to the wall. Often there will be a small rise and you can remove this by either sanding the sides down or using an exacto knife to carve away the ridge. Next, use a putty knife or your finger to generously apply the putty making sure to leave it a bit proud (this is some Hubs lingo for ya....I have deduced it to mean "a little extra"). I really like using the putty that turns white as it dries (starts out bright pink, which I also quite enjoy!) Once it is completely dry, I use a small piece of sand paper wrapped around a small block of wood to sand it down. You can literally use any block of wood. I have scraps in a box that I pick from, but in a bind once I even used a toy alphabet block to do this! It just allows you to have a better grip and apply even pressure when sanding. Make sure to sand the entire area, even a bit beyond the edge of the putty, to blend the line where wall meets putty. Check the smoothness often with your other hand too! You will be amazed how there is no trace of the previous hole once the paint is applied!
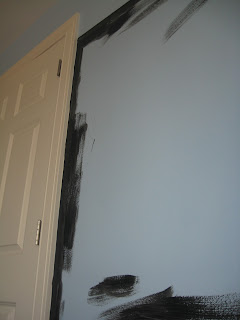
Anywho....moving back into Bray's new wall....after the holes were filled and sanded, I used a 6 ft level to create my top and lower border. I decided to curl the wall around his bed area. I also used the window and the closet door to eye ball where the borders should lie. I went about an inch higher than the bottom of the window and a few inches below the top of the window and the closet door.
 |
| Before |
 | |
| Using the window casement as my plumb line. |
You can see in both of these pictures that there are some errant brush strokes of paint. I did that to clear my brush so that I could get a clean line along the edge of the border. You can also do this on a spare piece of cardboard (old pizza box) or some paper towels. I think it helps keep the paint brush from getting too much paint on it.
Next came the fun and easy part....using a roller to color in the rest!
 |
| Pay no attention to the light fixture, more on it later! :) |
Allow a full 24 hrs between coats and before use! I used street chalk (the BIG stuff) on it's side to apply a base coat of chalk (this will help the chalk adhere better later).
 |
| Again, pay no attention to the light! HAHA! |
We are in the process of transitioning from the toddler bed to a twin because Bray seems to enjoy stuffing insane amounts of stuff into the bed while he sleeps! Stay tuned for the upholstered headboard I made him!
**I had to add this picture. This is what Bray likes in his bed. You can clearly see why the need for more space! HAHA! And every night he also selects a truck to sleep with too. Occasionally we luck out with a small, handheld one, but some nights, the big metal Tonka dump truck gets some spoonin'!**


i love chalkboard paint! this looks great. we had the same crib for our annie girl. hope you're doing well!! xo m.
ReplyDelete