Wednesday, August 24, 2011

Updating a Piece...Again!

Ever get that nagging feeling when a piece of furniture is just not working for you? Maybe it's the spot it's in, or the color of it, or the hardware.....but something is just. not. right. I have been having this sort of love/hate affair with the highboy dresser turned bar console in our dining room. Let me take you on a brief tour down memory lane........

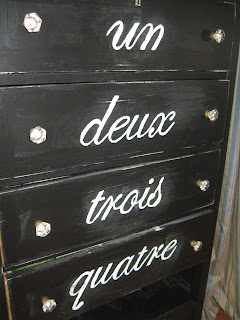
A friend of mine found this cute little dresser on craigslist and immediately sent me the listing. It was love at first sight and after looking it over I knew it would be turned into a bar. After loading it up with stemless glasses and wine paraphernalia, I was even more in love with it....until......the corner it was sitting in didn't feel like it was noticeable. I had worked hard on it and I wanted to have it stand out more. I didn't want people to look and think...."Gah......why is there a dresser in here". After facing a disaster with yellow paint (don't ask), I realized that by stenciling some numbers along the drawers, the piece had a lot more personality.


This brings me to the present day, when for over a week I kept rambling on about how it wasn't quite right. I saw some pieces that used the same idea but with the numbers as words. I particularly liked the scrolling script on this piece by Molly Susan Strong!

Call it one too many viewings of Ratatouille with the boys, but I found a way for me to be happy again when I glance over at that lil' dresser!


Notice the missing wine bottles underneath....Mama needs to stock back up!
I used the same technique from creating wall quotes and rubbed over the lettering with a fine grit sandpaper after it dried. It looks slightly aged and stands out in the corner. Exactly what I was looking for!

How to Create a Terrarium


I think the title of this post makes it sound a lot more complicated than it actually is. Truthfully it sort of hit me when I was out a few days ago and saw a terrarium at a store. I L.O.V.E. the look of them and always find myself drifting over to them at shops, but more often than not, I usually am back stepping once I can read the price tag. This is typically followed by me muttering something like....."It better be able to cook me dinner and do the laundry for that price." Finally I had a light bulb moment and realized that DUH! I could DIY one!

The best part is that you may already have all of the "parts" to do this project.

You will need:

a glass hurricane (something with some height)
a plant saucer
a small potted plant (I particularly love when herbs are used!)

After scurrying around our storage for a bit, I found the glass hurricane I had in mind. At that point, I just snuck out to my garden, grabbed a saucer and some lemon oregano and put it all together!

I added a little wrought iron bird on top (like a lil' finial) to finish it off!


Monday, August 8, 2011

Kid's Upholstered Headboard

I am still in amazement daily at how much our babies are becoming boys. Bray wants to do everything himself now ("no thank" might be the most popular word phrase EVER). And sweet Miles is a hop,skip and a jump away from walking. Everyday I feel the internal struggle that I am sure every parent feels. You want them to walk, talk, dress them selves, etc etc etc and then the minute they do, you find yourself back treading because they are growing WAY. TOO. FAST.

At 18 mos when Bray vaulted out of his crib sans Nadia Comanici, I had a brief moment of "Please not yet" at the thought of him in a "big boy bed". That was the first of many first's that brought us all the way to bringing in the for real's big boy bed! Yes, we finally caved and gave the kid a twin bed. It was the only option to accommodate his face down, star fish, take no prisoners sleeping style. For now, he still has his "Lovie" and of course his favorite fleece blanket, but for the most part he is officially sleeping in a real bed (no side rail either....insert sad face.)

This development has obvious perks. No lugging two pack and plays anywhere, not having to worry about where to put him to sleep if we crash at the in laws etc. It also has created an issue on security. Bray is a ninja at escaping a room or even a house. Just this morning, he bypassed a door and two baby gates and went downstairs to get himself some milk. Upon realizing he couldn't get the leverage he needed to pull the milk from the fridge, he came back up stairs to get me to "Haaaaaaaaaaahhhhh.....lp" him. We have had to install multiple obstacles to keep him safe and that has created a whole new neuroses at bed time. Imagine me sitting there running the check list with the Hubs......

"Is the basement door locked?"
"Garage doors down?"
"Security knob on the basement stairwell door in place?"
"Slider locked and baby lock added?"
"Front door and screen locked?"
"Baby gates locked?"

And on and on.

At the end of the day, these are all inevitable facts as they two lil' meatballs grow up. So after that rant, here are the shots of an easy upholstered head board!

I got the idea when I was cleaning out our linen closet and happened upon a day bed cover from Pottery Barn. Yes, it was a wedding gift. No, we don't even own a day bed. Why did I put this on our registry? I plead the fifth. Knowing that I would never implement this cover as it was intended, I decided to start looking at other uses (pillows, curtains, even a chair cover). Then I remembered how much Bray needed a headboard and my decision was solidified.

I measured the dimensions of the twin bed frame we had and cut a piece of low grade plywood in the same width (the height here is totally up to you!). Once I had the size I wanted, I went to our local fabrics store and had them cut a piece of extra thick foam to match.

In order to create a little extra fluff, I also purchased some batting. I unrolled my batting and then placed my foam down, followed by the piece of plywood.


Enter, my handy dandy Powershot. Working from the middle out, I stapled the batting to the back of the plywood. I think it's easiest to start this way so that the extra batting and fabric gathers in the corners, creating a smooth piece of fabric.


The frame was a perfect fit along the width to a fitted twin sheet. The day bed cover had piping so I incorporated it's piping and seam to the headboard for ease.


After the fabric is lined up, I just followed the back side with staples again. A quick hit with the iron to get rid of the wrinkles and I was ready to head up to his room.


I attached it to the bed frame by just using two pieces of scrap wood to create legs. I then used two anchor screws per leg to attach it to the exterior of the bed frame.


At some point I will get crazy with the bedding, but for now we have a happy two year old! He has all he needs: space to spread out, books at arm's reach and storage for his matchbox!


Wednesday, August 3, 2011

Reupholstery 101

In another attempt to learn more about upholstery, I picked up a Queen Anne's chair from Craigslist (they seem to pop up daily in the free section.....score for me!) I figured as long as I was working on a free piece, any mishaps or major ruh-roh's were A-OK. Guess that makes me a "calculated" risk taker? Anywho, as with my other Queen Anne's chair project, I wanted to find a way to do the entire project on a strict budget and in the easiest manner possible. I do not own an upholstery gun so the ole' powershot and glue gun would have to do!

I started searching for ideas for fabric and I cannot tell you how much I love the designs from Shawna Robinson at Happy Chair.


Seriously, this woman is my upholstery guru crush! I am not sure why her chairs elicit....well...happiness in me...Is it the colors, the mix of fabrics and textures? Either way, I find myself surfing her site often (cue the drool).

I noticed some chairs where she used swatches of burlap or jute and it got my brain spinning. So of course, in the jumbly, spastic way my mind sometimes works, I started searching for chairs made from burlap, jute and old coffee bags. After cleaning up more drool (there are some seriously amazing pieces out there), I started to feel confident that I would use coffee bags. Pluses here are the fact that I would be recycling (or upcycling) and that the fabric is durable and forgiving for the upholstering rookie.

Next up was getting my hands on some bags. An online search led me to believe that A.) these bags are seriously overpriced and B.) I couldn't select the ones I wanted. Lucky for me, there is a local coffee shop that has some hanging in the windows as a decoration. A quick phone call revealed that they had "tons" (exact words) and that they would be happy to sell some. I took a deep breath and asked what they charged per bag and after a pause......"Would $1-2 be OK with you?" Um, ding ding ding....yes, my dear that would be more than OK!


After picking up my bags, I felt a little surge of bravado and decided the only way to jump in was to literally just get after it. Step One: breakdown old chair. This is easily done with a little sweat and a sharp box cutter.


**If you have sensitive skin, the underlying batting and stuffing may make you a lil' itchy, so wear gloves!**


Once I had peeled it down to it's bare bones, I used about $6 worth of thin quilting batting to create a smooth and plush surface. This also helped me to expose exactly where I would be stapling the bags to.

I looked at a lot of sites and I found a few to be very helpful. The Creative Maven had a great tutorial as well as antiqueupholsterer.com. Although I did not follow these instructions to a T, it did help me understand how to start and where to attach the various pieces.

I decided to start with the arms as they looked the most difficult. By laying out my bags, I was able to drape the chair with the various bags to determine what would go where. After seeing it in this light, I decided on using the back sides of the bags for the arms.


Exterior and Interior Strips of Arm Attached.


"Fan" folded by hand and stapled at the base. Leftover seam from bag twirled into a pinwheel and glued down to cover staples.

Once both arms were pulled through and stapled. I decided to start on the on the front side of the back and the upper arm wings. These were a little more difficult than expected simply because it was a hard to pull the fabric taut and push it through to be stapled on the back. A little maneuvering (and maybe a swear) and it was stapled into place.

Since I did not want to pull out my sewing machine to do the wings, I draped the fabric and pulled it through to the back and under the arm. After stapling it to the wooden frame, I folded the top to create a seam and stapled it down. The burlap was then manipulated and pulled to cover the small bit of staple that was exposed.

Wings attached like an envelope and then a seam created along the top.


Pulled through to the back of the chair and stapled down to the wooden frame.


I could finally see it coming together and was starting to actually feel like I may have pulled it off. To attach the back piece, cut a bag in half and in an inside out fashion stapled the top following the curve of the chair.

Stapled the fabric on the underside to hide the staples. Followed the curve of the chair.

Once it was stapled, flipped the fabric back down and was able to achieve a clean, taut seam.

Then I pulled the fabric taut under the bottom side of the base and secured with staples. A few staples over the top of the fabric on the sides of the chair held the sides down. I hid these by angling the stapler and then pulling the burlap a bit to cover the staple.


For now, I am using the original cushion. I may recover this (which will surely require me to break out my sewing machine....big sigh). Love the finished product and feel way more confident in upholstery!


Currently linking up over at:


Chic on a Shoestring Decorating

The Shabby Nest


Furniture Feature Fridays


Tuesday, August 2, 2011

A Catch All

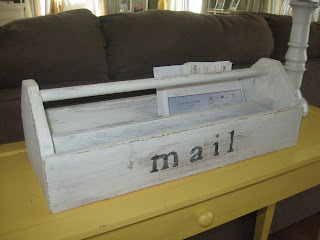
I have oodles of little projects going on (most involving a little boy who seems to be growing up WAY. TOO. FAST.) and I thought I would start with a very easy and cute one. We seem to have a major issue with clutter at the end of the day. Somehow, against the futile fight I engage in, wallets, mail, loose change, glasses (how do we have so many) and all other bric a brac that lives in your pants pocket ends up strewn on the kitchen counters. For a short while, I had put a little dough bowl in plain sight to toss all of it into (obviously to be sorted later....eh hemmmmmm). Then, in typical fashion, I saw a much better spot for the dough bowl and lost my clutter catch all by the door. Enter a small $5 find from a barn sale.

 I saw this carpenters tool box and knew I would use it somewhere. It spent some time on the coffee table. And then it was a fun carrier for matchbox.

After I moved the dough bowl, I realized that we really did need a centrally located catch all for the little daily things that accumulated. I started by giving it a VERY light rough sand. There really wasn't much of a finish to it anymore so I didn't want to abuse it. Next it was a dry brush with white paint. To achieve this look, you just lightly dip the tips of your paint brush in the paint and then brush off the excess with a paper towel. It leaves you with a brush stroke that allows you to see the lines of the paint brush, an almost aged look. Another technique to give a similar appearance is to mix a little plaster in with the paint. You can get a chalky, antique feel this way (Spoiler alert for a future project!!)

Once I was happy with the overall appearance of the box, I used the letter transfer technique to put the word "mail" on the side of the box. A little touch with fine grit sand paper and I was very happy with the result!


Related Posts Plugin for WordPress, Blogger...