Saturday, January 29, 2011

Sunburst Mirror

I. LOVE. THIS. PROJECT. Cheap, easy, non time consuming. My inspiration came from The Nester. I was browsing the internet and kablam!

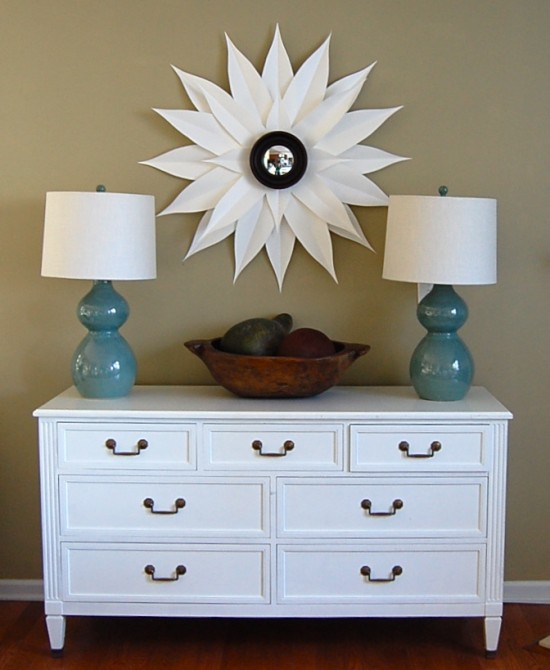
I really love how different it looks compared to the conventional starburst/sunburst mirrors out there. Plus at a total cost of $4 for the entire project, even if it blew up in my face it wasn't a loss! I found a small round mirror at the Dollar Tree. Since my mirror did not have a frame, I decided to create one with leftover sisal rope I had from my rope mirror project.


A little hot glue and some twine to finish off the area where I glued together the two ends of rope and I was left with this.

Next I folded a piece of computer paper in half and drew out the shape of the "rays" of my mirror. You can get creative here and make a shape that pleases your eye. By folding the paper in half, I ensured my template was even on both sides.

Then I made 12 copies of my ray template across 2 pieces of white, non-shiny poster board. After cutting each ray out, I folded each one in half to create an architectural look. This also let me clean up any edges that were uneven. The 12 I made on poster board were the longer rays. I also cut out 4 medium sized rays and 4 small sized rays out of white card stock. At this point you can play around with the layout of your rays in relationship to your mirror. Again this is totally up to you!

Playing with the layout.


Remember to work from the smaller rays out to the largest when gluing. Also, always work in fours (N,S,E,W) when applying the rays in layers. Apply hot glue to the flat end of the ray and start adhering them in the order you selected.


This was such an easy project and is motivating me to finally finish up my window treatments in our master bedroom. I am hoping to wrap up the master redo (yes, we have lived here for 6 months and I am re-doing our bedroom). Oh and did I mention the Hubs has a heart of gold and is going straight to heaven for putting up with me and our ever evolving home?

Sunnyside up!

Another weekend blazing by! The cubby project is temporarily put on hold due to overcrowding in the workshop. The Hubs is working on a few projects right now and I can't stand to add one more mess to his list! Especially considering I typically ask him a bazillion questions.....what do you think of this? Do you think this looks nice? How does this make you feel? Why are you looking at me like that....it's a legitimate question? Etc etc etc.

In the meantime, I have a few smaller scale projects that I am trying to tackle. Today I made headway with two of the 4 projects on my TDL (to do list). My list is as follows:
1.) spray paint mismatched vases and old lamp for some accent color in the living room
2.) make sunburst mirror
3.) make burlap curtains for the master bedroom
4.) paint new curtains for the living room

Yes.....I said paint. Stay with me here folks. For starters, let's take a quick looky lou at the first item on the list. I have been feeling like our living room needed a secondary color that would pop a bit against the cream and light green. I kept waffling between a pop of yellow or orange. Yellow won out (and good thing because I already had some yellow "summer squash" spray paint). Mostly I went with yellow because of our cute sofa table that everyone seems to comment on when they come over.

It's cheery and in a never ending battle with the winter grey out our windows, I am liking it. I had an old lamp that was picked up at a yard sale and some mismatched vases lying around. (I always come home with vases.....it's a sickness....really) A couple of coats and .....

Yard sale lamp.


Mismatched pottery and vases.

Plus, total bonus, I like how the pop of yellow in the media center brings out the chippy yellow paint on the antique planter up top. Lastly I found some old PB pillow covers and threw them on the couch to continue with my sunny  mood. So although it's a little monochromatic outside of our house, we've got COLOR inside!

HAHA my yellow PB pillows next to my $1 shopping bag tote pillow cover!


There you have it. Item #1 crossed off the list. On to #2!

Friday, January 28, 2011

Food for Thought

Hey All!! Quick post today about a brand new blog that I am LOVING! I wanted to share with you all for a number of reasons:
A.) I am secretly a foodie....well not a secret to people that have dined with me.
B.) I love learning more about what I am putting in my body (and the smaller bodies I cook for!)
C.) And I happen to know the blogger (we may share some DNA) and she is FABULOUS!
Hope you enjoy as much as I am!!

Generation Y Foodie

Get at it! YUM!

Thursday, January 27, 2011

Organization Station

Hey party people! Good mood central over here so be warned. The kiddos are on the mend which means back to regular napping (= mommy can get to work)!

I have two quick projects that were completed today and although small in time and effort, they are big in other ways! The first was a nod to the post "Shut the Door!". I have been thinking about using a door in the bathroom to display items when....BAM! It hit me. I had a leftover antique shutter. It is the partner to the one I use by the front door to display cards and hold our daily mail. Some hanging nails and it was easy cheesy. What's better than it being easy? Me LOVING it.


And for my second project....drum roll please....seriously this is MAJAH! I organized all of my crafting supplies. I have a workshop in our basement for refinishing furniture and painting etc but I wanted a spot in the house where I could kick back, blog (eh hem) and sew or do whatever other crafty thing suited me! Our walk in closet which will some day become our master bath (one project at a time peeps) is big. Master bath type big and there is the most perfect nook for our future bathtub. Prior to today it was open space so I staked my claim while the Hubs was away. So now I can tuck away once the kiddos are asleep and tinker in my new space!

Old wine crates turned shelves.

The organization is killing me....in a good way!


For now, I have a little farmer's table as my desk. Soon I am making a custom one!

Wednesday, January 26, 2011

Built In Bookcases

I cannot tell you what a few busy days I have had. Both kiddos are sick so that in itself has been draining. Poor lil' buggers just want to snuggle. Yet somehow I have been able to check little things off of the list. Mostly just my planning, but that is always a step in the right direction. I have a nasty habit of collecting oodles of pictures of ideas, so I am making a concerted effort to minimize "catalogue".

This week's project is the cubby space in our master bedroom. I feel like a potential participant on DIY Network's Wasted Spaces. It really is an odd area of the room. Technically speaking it is the space just above the front door entry. In some homes this would be open and lofted to the second floor. For us, the bedroom cuts deeper here to create a cubby. So I am going to forge ahead and make it a highlight in the room. Here are some of the options I have gathered so far. I am making a choice tomorrow and getting cracking this weekend...barring any unforeseen rebounds with the plague.


I love how it looks like a built in rather than just a collection of shelves. I am looking for something that will have a more permanent feel to it.


A little different and offbeat which I love. Since the space is narrow and tall, not sure how this look would play out.


Now here they have made adjustable holes in the walls for the shelves. Not sure if I want the option to adjust or not. So many decisions.....


Contemplating how difficult it would be to create cabinets. See. Here we gooooo....complicating things with a million thoughts. Will. Decide. Tomorrow.

Tuesday, January 25, 2011

Master Bedroom Rewind

Before I head to bed for the night it is fitting that I have our bed on my brain. I adore the look of our bed. The headboard was made by the Hubs and it's gawjus.


Now here is where I am starting to toss around the idea of playing up the wall BEHIND the headboard. I am thinking that I want to accentuate a rectangle of wall just outside the sides of the headboard that extends to the ceiling. Maybe do a painting technique or a wall covering? I am gathering ideas as we speak......


I am feeling another trip to Lowe's on the horizon. Stay tuned....

Shut The Door!

Starting to wonder if I am crazy because I am finding stuff left and right that I want to try and some of it seems a little coo coo cachoo. Example A:


Chalkboard paint on a door? Let's dissect this for a moment......totally cute, really easy, not expensive....but is it practical, would it look ridiculous and if it doesn't work, will it be a disaster? Thoughts to ponder.....

Example B:

Sticking with the door theme. In no way shape or form do I have the room in our shared bath for this, BUT (can you hear my brain wheels turning) we do have an as yet unfinished master bath.....moohahahahaha.

Ahhhhhhh now I have some things to consider......I like the idea of the door leading to the basement being done in chalkboard paint. Or even the back of the boy's doors in their bedrooms. Options, options, options!

Monday, January 24, 2011

Typography 101

You know a trend is really getting big when it starts effecting the masses. Everywhere I go lately I am seeing the influence of typography. Once a specialized occupation, digitization has allowed everyone from graphic designers to you know who to be able to create this form of art. I have always been attracted to using letters, words and symbols in my decorating (as evidenced from the "C" in the master, the "B" in Bray's room and you guessed it the "M" in Miles' room). Now it is expanded beyond just a letter and WAY beyond the basic applications. Recently I purchased the letters "eat" for the kitchen and it made me start to look at different ways typography is being used.....and needless to say I am hooked. This girl loves me an ampersand!


I am loving the chandelier. So quirky and offbeat, but a little bit of whimsy like that goes a LONG way.

I see this in my future. My very near......future.....moohahahahaha. I have seen these in many different finishes. What a cute way to display books on a dresser or sideboard. Even cuter in a little kids room.

Loving this ode to romance. All of the words on it signify a milestone and memory in a relationship. I would love this and I can see it used for parents and kids or best friends. Great gift idea!

How cool is this? Never would have thought of it, but love the idea. Would definitely be a one of a kind thing!

And of course, I too have started some typography using just Microsoft Word and some card stock. I wanted a centerpiece for Miles' bedroom on the newly painted wall above his crib. It's simple and I love it. I was thinking this would be such a cute gift for a baby shower!


Check out Etsy for great ideas and very reasonable pricing on typography prints. I am particularly loving the following:

I Adore Decor
Jennifer Ramos
The Paper Tray

Nursery Ideas

Although I love Pottery Barn Kids, I rarely can bring myself to spend that type of money on decor that will be outdated in the same year. Kids are ever changing in their likes (currently Big Lil' Man is into construction while Little Lil' Man is into spit up and rolling over). With all of the big boy redo action for Bray, I was feeling like Miles' room needed a little touching up. In the hopes of finding some inspiration, I started looking through some of the design rooms on the PB Kids website and fell in love with the picture display here.


The ticking border along the white accent stripe is adorable and plays into the baby theme, like a little stitched stuff animal. I liked it so much, I figured I would give it a whirl above the crib.

Before - Basic = Blah  


This was as simple a project as I could have hoped for, but ended up really giving a lift to his space. To start, I used a large level (6 ft) to draw a very light pencil line (one high and one low). Using flat interior wall paint in white, I cut in along the sides and lines. Following this I used a basic nap roller to fill in the middle space with the white. Since I didn't have any brown wall paint, I stopped into Lowe's and picked up a paint sample in "Chocolate Chip" brown. These sample sizes are the perfect amount and are only around $2. You cannot beat that price. Plus since so little was used on this project, I can have the remainder for crafting or other small wall paint projects. I used a small paint brush to create the "ticking" marks along the border.


Lastly I re-used the two prints I already had and added in a home made typography print with Miles' name to center the wall.

Adorable print given as a gift at my baby shower.

Home made typography. Love it!


The finished product.


Cute, right? Me likey!!

Thursday, January 20, 2011

New Love(s)

Since Oprah has an entire show dedicated to her favorite things, I figure why can't I throw in a little post about some of my favorite things. Two in particular.

For starters, is anyone else as obsessed with Jules' house on Cougartown as I am?? I literally watch religiously and try and pick out little things here and there that make me swoon. In particular, I adore the letter blocks that spell out EAT in her kitchen.


In an effort to make this look my own, I started looking around online for similar lettering. Although I was considering buying wood letters and painting them, I soon discovered exactly what I was looking for.


Again Anthropologie hooked it up....and this time at an affordable price. They are a great size and the fabric is beautiful. I found the vintage spoon and fork on Etsy and the look came together.

Speaking of GAWJUS fabric....my other "new" favorite thing is this great storage trunk from Target. I was itching to create a dressing area in our master bedroom. This bench is the perfect addition to not only add color, but functionality. I can fit 15 sweaters in this thing! Worth every penny and comes in a variety of colors. This is a must on my favorite things list!


How great is this print?

Related Posts Plugin for WordPress, Blogger...