In the interim, I found some evening time to finish up an armoire that was handed down to me from my aunt. It was actually my grandfather's as a child. The piece itself was in fairly decent shape considering how old it is and that it has not been used in a very, very long time. Cosmetically the wood was in decent shape, but structurally I needed to spend some time repairing and stabilizing the door and legs. Here she is on the day we picked her up!
I knew exactly where I wanted her, so that helped to determine the color I wanted. So began, the very easy process of sanding her down. Due to her age and wear, most of the finish had worn off. I lightly sanded everything down and removed the drawers and door for repairs. I flipped the entire wardrobe onto her side and placed a few screws into each leg from underneath so that you wouldn't see any unsightly screw heads. By drilling directly into the base of the legs, I got a tighter fit against the body of the wardrobe and this corrected the wobbly feeling. I also went around the back of the piece and placed a few brad nails around the perimeter to keep the back piece of wood from bowing.
Next up, PAINT! Here is where I really had fun. I have a ton of sample paints laying around in varying shades of blue, so I simply started pouring a little of this and a little of that into a plastic container. Lastly I added a bit of Dover White to soften the color and give a little bit of sheen (the Dover White is in a semi gloss finish as opposed to the satin finishes of the samples). I put a light coat over everything and then took a small piece of sand paper to the edges of each drawer, the door and the wardrobe itself.
Once this first layer of blue was down and distressed, I went back over the entire piece with some antiquing glaze and a cotton rag. I like the random look of streaking the glaze on in vertical wipes. Some people prefer to do circles when rubbing it on. Totally personal preference! Just remember that the glaze soaks in quickly so to keep your hand moving. I used the Valspar glaze.
After my glaze had dried, I decided to lightly brush on some silvery gray paint from a sample. To do this, I started with a very dry small paint brush. I dipped it lightly into the sample and then brushed off the excess on a paper napkin. Then I very lightly feathered the paint onto the piece.
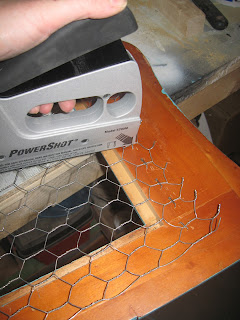
It just added another layer of age and depth to it overall. While I was waiting for all of this to dry, I started thinking about how to change out the hardware and door to make the piece a little more me. Then my eye caught the chicken wire (that I HAD to have, as the Hubs chuckled in the background, on our last trip to Lowe's). I removed the small tack strips from the back of the door that were holding the center piece of mdf (medium density fiberboard, a thin piece of plywood basically) in place.
I measured the length and width of the opening and using my wire cutters, I cut a piece of wire to fit. Be extra careful here and wear gloves. That wire is a pain in the.....Then I just used my power stapler to secure the entire piece to the backside of the door.
Some sale knobs from Lowe's and I was ready to start piecing her back together.
It was here I noticed that now you would be able to see right into the door. Cut to me breaking all the paint back out! A few light brush strokes of leftover white paint and I was all set.
 |
| I know it looks sort of awful, but I didn't want it to look perfect! |
 |
| White ceramic knobs. |
 |
| Great for jewelry and for clothespins with love notes! |
 |
| Some fun accessories for up top! |
 |
| Love the finish! |
Linking up with:


I love it! That was in my bedroom when I was a baby. It was grandpas, then our moms, and then it was in my bedroom and then Jeffs. What an heirloom.
ReplyDeleteHi, Colleen! I love how it turned out. The turquoise blue is perfect for the armoire. Great job. Thanks fors sharing at the Creative Bloggers' Party & Hop :)
ReplyDeleteBeautiful transformation. This is amazing!
ReplyDelete@aggieam01
ReplyDeleteThanks so much. I can't wait for my grandparents to see it and tell me what they think. Blows my mind that my Grandpa used this as a child!
@SJ @ Homemaker On A Dime
ReplyDeleteSJ I am loving your party!! Is there a button for it?? I can't seem to locate it if there is! I want to post it here too!! :)
Great job on the armoire. Love the colour, lovely transformation
ReplyDeleteThat is adorable! Love the chicken-wire--great posting and very inspiring for my weekend!
ReplyDeleteLove it, the chicken wire inset is really wonderful, love that blue color!! Thanks for linking up to VIF! xo Debra
ReplyDelete