Thursday, December 30, 2010

Front Hall Flossy

Ahhhh finally back in the swing of things around the ole' homestead! After a busy holiday and a week of illness (I am the outbreak monkey in my house....sorry fam!), I am newly motivated to get on top of some projects that I have been procrastinating on. A major one has been our entryway. The downside is that when you enter through the front door, you immediately enter into the main living area. There is no official area allocated for the removal of coats or the dropping off of the mail. We don't even have a closet to hide the over abundance of cold weather gear that is now floating through our home!

Due to our open floor plan on the first floor, we opted to paint the entire first floor, sans the laundry room and 1st floor bath, a neutral, very light green (pine mist, Benjamin Moore). Then to define each space I changed up accessories, curtains, area rugs etc etc etc. Now I really want a more defined entryway to break up the space between the kitchen and the family room and I think I have found the perfect solution.


The wall that leads into the kitchen is being covered in this divine paintable wall covering in a Spanish tile pattern from allen & roth. Again a sucker for this Moorish style pattern, I saw it and had to have it. Opposite this wall will be a row of book shelves that will abut the back of the sectional. Instant hallway! The Hubs is working on building the book cases (complete with delicious crown moulding) and I have been put in charge of applying the wall covering. So I am off to get the ball rolling.....

Thursday, December 16, 2010

A Bright Idea

At long last I have finished the bar nook in the dining area. If you remember....


I repurposed this highboy dresser into a bar for our dining area. I was a little torn on the top of it, but I think I have finally achieved "the look".

I found three mismatched pieces of turned wood at a barn sale for $1 each and I thought they would be fabulous candle pillars. Nothing a little white semi-gloss paint couldn't fix!

After 1 Coat of Paint (Semi-gloss Dover White)

Before

Before

Add that with the rope mirror I made a few weeks ago.....

I added the little wine corks behind for a quirky touch!

Then last weekend I happened upon this FABULOUS antiques barn Sage Farm Antiques where I found the cutest little vintage lead crystal lamp ($10)! Talk about finishing this area off right! Woot Woot!!


I love the way the little crystal knobs tie in with everything too. How great does it feel when you have an idea and then it suddenly becomes a reality (cue sappy music....)

Repurposing - 'Tis the Season

Quick post with a fun little idea that is light on the wallet and the time clock. I love finding items, antique or new, and then repurposing them in an offbeat, unique way. I am really into the look of antique shutters.....this gal is a total sucker for some chippy paint! I had purchased a few to hang up in the new house simply for the look of them, never expecting for them to become a functional piece in our home. The idea came about when we came home from the hospital after Miles was born and we were inundated with cards from family and friends filled with congrats and well wishes. I wanted to display them and with a toddler running around, placing them on a table or shelf wasn't flying. Hence the card shutter was born. Now for every holiday card, invitation or fun picture we have, there is a home to display it!

(Dis)Stressing Around the Holidays

Hey All!! So it has felt like a year since my last post, but Mama has been busy. I had the crazy notion to make a lot of Christmas gifts this year. Sooooo although all has been quiet here, in my workshop all hell has broken loose. Bonus is that I will have lots of cute stuff to post after the gifts have been given!

In the meantime, I have been diligently working on a project for Bray's room. Since the kid has a more extensive (and stylish) wardrobe than yours truly, he was in desperate need of another dresser. I was passed down this gorgeous antique chest on chest that was screaming for an overhaul (Thank you Joyce). Of course I would love to show you the sad before picture, but in my excitement I forgot to take a pic before the painting fun began.

All in all I really wanted to try my hand at distressing (using an antiquing glaze) and I had an image in my mind of a really worn, barn red color on it. I made the trek to Lowe's and came home with Valspar Tomato Red as my base color. It's important to point out that I find the primer/paint combo in satin works really well for these projects involving glazes or crackle paint. Plus I am game for anything that saves me a few extra steps these days.

The most critical step in any painting/refinishing project is the first one: the stripping/sanding process. It is imperative to put in the extra effort here people. I can't tell you how many times I have trudged through this step or skipped it all together and then paid the heavy price for it later. You wind up with paint that sloughs and chips at the drop of a hat. It's not pretty.....

This time around I wasn't kidding, so I went all out with my bff, the power sander. I took every last inch of finish off, leaving this glorious base just waiting to suck up the paint. Before getting the paint out, I very carefully vacuumed the entire piece with an attachment to make sure that all dust and debris was gone. The last thing you need to deal with is clumping and goop during the painting process.

Here comes the fun part: PAINT. No way to screw this up. Just work slowly in even sections. I found that I needed three coats of Tomato Red to achieve the deep, barn red color. Truth be told, I nearly keeled over when I first opened the can and it looked bright pink. (Can you hear the record scratching?) Luckily it dried in a gorgeous deep red that was a perfect match!

After allowing it to dry 24 hours after the last coat, I pulled out a small grit sand paper and lightly rubbed at areas on the dresser I thought "would have" received the most wear. Corners of drawers, the moulding, edges etc. 


The next step is really what gives the aged appearance of the paint. I purchased a small container of Valspar Antique Glaze from Lowe's. The small bottle was around $8 and I only used a very small amount so I thought it was a great buy. To start, use a cotton rag that has been lightly dampened with some water. I then just dipped a corner of the rag into the bottle and began to wipe it onto the dresser in small strokes all in the same direction. The bottle recommends going in small circles, but I found I wasn't a fan of the way it was finishing (but feel free to mess around with this part to achieve the look you want). You have time to wipe it away and start over (unlike other antiquing processes). Once I had applied the glaze to the entire dresser, I let it dry for a complete 24 hours. At this point you can decide whether or not you would like to apply a clear coat to finish and seal the piece. I didn't, but knock yourself out.....and bless you if you are that patient! HA!


Lastly I happened to see some pulls on sale while I was buying the paint, so I was able to dress it up with brand new hardware for under $20.

Total cost including all paint and hardware was just shy of $40, but I would like to point out that both the paint and glaze will be used for multiple projects (a long term investment as I see it!). All in all, WIN WIN baby!

Wednesday, December 1, 2010

Lassoing a Project

Copying is the most sincere form of flattery, right? I saw this on the Nate Berkus show and loved it. So as I have been scouring for something to put on the wall behind the bar, this idea reeled me in. (notice all the subtle hints to rope! HAHA) Here you can find the exact directions. Below is my finished product!


To finish the bar top off, I am on the hunt for the perfect lamp. I would love to find an inexpensive copy of one of these....

I love the clean look of the vase itself, the clear glass and the neutral shade. Plus the natural finish on the shade will tie in with the sisal rope.

Side note, I was able to purchase the sisal rope and twine at Lowe's. Surprisingly they have quite the selection of different jute and sisal ropes. You can select the thickness you like. Other ideas for using rope which I am tempted to try would be to cover a lamp base with it or do the same project around a really cool frame. Either way, with this whole project costing me under $12 it was well worth it!

Tuesday, November 30, 2010

Shadow Boxin'

Hello everyone. So sorry for the long delay between posts. The tryptophan got to me and with 2 Turkey Days celebrated, I OD'ed a little! I hope everyone enjoyed the mirth and merriment. Things have been fairly quiet here at Casa de Farias. Christmas decor is being broken out this upcoming weekend and I CANNOT WAIT. This year we are getting 2 trees 'cuz Mama said so! I want a traditional tree to decorate in the house, but I also want a tree done in silver and white for our farmer's porch. So this weekend we will bundle up the kids, get a few cups of hot chocho and march out in to the woods at Magnusson Farm to cut down our own trees. (Secretly I am looking at the end of this season to invest in some fake trees. As each year passes I am feeling more and more sad about how wasteful it feels to cut down a living tree for a few weeks. Maybe we will do a fake tree next year and just a whole lot of evergreen scented candles? )

Anywho, I finally got around to decorating the shadow boxes I had and let me just say....me likey! If you remember, I had posted some shots of ones that inspired me. This one in particular was catching me eye.

And this one.....

So I printed out some moorish tile printed paper and broke out some costume jewelry from many moons ago and got crackin'. With just some push pins I was able to secure both the paper and the jewelry in the boxes. I also thought it looked a little more graphic with different styles of the printed paper. So in one I expanded the tile print in my Paint program in my computer.


I just kept within a certain design. In this case, I used all jewelry that was gold and coral. The center box is just a beaded necklace twirled around a gold and coral antique broach. The best part is that I can easily change this out as it is just pins holding it all together.

I am still highly motivated to attempt the boxes with the crayon initials for the boys rooms. That may require a trip to the store for extra crayons!

Monday, November 22, 2010

Accessories....A Room's Best Friend

I am such an accessories fiend. It is getting ridiculous. I have three storage totes in the basement with various glass vases, candles, picture frames blah blah blah. Every time I even open my mouth about how I NEED some little trinket or accent I can almost hear the rattle of my husband's eyes as they roll. Small accessories and accents can really add that extra pow to a room and they truly can be added in a budget friendly way. Besides the obvious places like Clearance and Sale tabs on your favorite websites, rummage sales, indoor flea markets (especially important in these chilly New England dimly lit days of late) and yard sales are great stops in your quest! The following are some inexpensive adds that I have in my home as well as some that are truly fabulous (and may make their way into my home...hehe).


Vintage keys seem to be popping up in design lately and I can totally tell why! I love the metal accent it adds to a room and they are perfect to create a grouping either on a wall or in a decorative glass bowl. The ones featured here are a STEAL through Pottery Barn. Less than $20 and free shipping....yes, please!

Some other steals from Pottery Barn can be found here and here. Anything that reflects light or adds some sparkle is a HUGE asset to any space regardless of the size of the object.


These are antique wool spools I found at an outdoor antique fair. At $3.00 a spool, I couldn't go wrong. I love the chippy blue paint that was original to each spool. (FYI..PB offers these for $129...bonus for me.) I have them grouped in our built in media center. They would also look darling displayed on a coffee table or a book case. I could even see a chunky pillar candle propped on the standing one.


This is THE piece in our living room. I found it at a local barn sale, pushed under a table with some baskets being stored in it. The seller had no idea what it had been used for. She thought perhaps a planter since it is basically a wood box with handles. The scrolled iron work is aged and has the slightest yellow patina to it. I can only imagine how many people probably walked right past this wondering what the heck it was. I fell in love with the design and knew I would find a place for it. This score was only $20.

My husband is hugely talented and he actually designed and constructed the built in in our living room. He is currently completing the bottom cabinetry for it, but during the design phase we got our heads together to see how we could incorporate this piece.


So by scattering these various inexpensive objects in the built in, I was able to achieve a high end look!

Another steal at a flea market....


This lamp was tossed in a card board box with items for $5. It still worked, but was a bit loose and wobbly. By simply tightening up the top with a screwdriver and getting a new lamp shade, the piece stands out on our drop leaf table. Isn't the patina gorgeous on it? I can smell hor d'oevres laid out on it at a holiday party this December as we speak.....


The Crate and Barrel outlet has some amazing deals. (Remember they mark down on Mondays.) This beautiful wire fruit bowl was under $10.


And lastly you can never go wrong with some really beautiful plants. I love succulents and tropicals. Easy maintenance and they can be moved on to your patio or deck for the summer time. Plus what is cooler than fresh lemons that you pull off your very own tree in your kitchen!

With the gift giving season fast approaching, an accessory for a room is a no fail option. Who wouldn't love to get something like these? (And who says you can't make the purch for yourself?)

Finally.....Progress

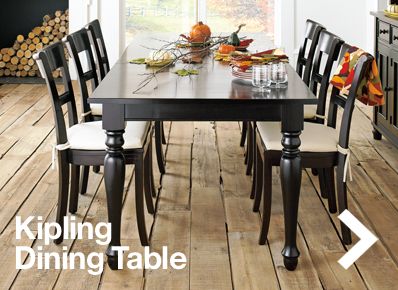
I have finally found time to start wrapping up our dining table makeover and I cannot lie....I am head over heels about it. Considering the way it all sort of came together on it's own, I think this may be the best score ever....both on price and style. Flash back a few Sundays ago and a small road trip and we found ourselves one Kipling dining table and 8 antique chairs richer!

Through the power of Craigslist, I met a woman who was emptying out her barn. I had been drooling a bit over the idea of a farm table with mismatched chairs. Lots of sanding and repairs and the look is complete.


The before shots.......


Drum roll please....and the after!


Now I am on the hunt for a different light fixture. I need something that has some farmhouse flair. Something a little rustic. Can you hear my fingers clacking away on the keyboard? The hunt begins......

Friday, November 19, 2010

Wreath 101

Do I have a thrifty, little crafting delight for you!! I was looking at some different ideas for a decorative wreath for our front door. I wanted something that had a lot of pow to it considering our door is apple red in color. I think a wreath of pine cones may just get lost on it. You would never be able to see it from the road and really that is sort of the point of putting any decoration on the exterior of the house!

I stumbled on a few GREAT sites, but this one blew me away.  I love all the different looks here. What neat, inexpensive lil' gems!

To get started I pulled out my supplies. After realizing that I did not have a styrofoam wreath lying around.....I...um...er...improvised.

Yes....yes that is a pizza box. I figured no one can say this project isn't "green", right?

To begin, find an old magazine (buh bye Salma) and rip full sheets of paper out of it. For the scale I was going for, I cut these pieces in half. Next I prepared the base by simply cutting out my desired wreath shape from the pizza box. I went with a medium sized circle.

Two key points to make here. Fold the paper however you like. An accordion, a hand roll....you name it.


Place little dabs of glue in each fold to hold this shape. Secondly, flip your wreath over and apply one layer of these folded pieces to the outer circle of the wreath. This will give a little extra fluff when you start applying the bulk of your paper pieces to the front of the wreath.


From here on out just work in layers and add as many pieces as needed to create your desired shape and look.

To hang it on the door itself, I used a little grosgrain ribbon in a loop. Hang it from a wreath hook anddddddd.......


Love!! And considering I used things I already have, this could not have been more economically conservative! Happy crafting people!!
Related Posts Plugin for WordPress, Blogger...