I have finally finished the front entryway project. Wait a minute..let me just bask in the glory of that statement....one more sec.....still basking....How good does it feel when you wrap something up and even better when you absolutely LOVE it. As everyone remembers, our front entryway was lacking personality, pizazz and pop! A little wallpaper, paint and some home craftiness and we are finally looking at something we are proud to welcome guests with!
Prior to our latest updates, the wall was looking like this.....
After many an evening staring at it and trying to figure out what wasn't working for us.....the Hubs figured it out! The white paint on the bottom was not showcasing the gawjus chair rail or the pattern on the wall paper. I can't lie....I hesitated here. I was set on the white bottom wall......but I went with it and am I glad I did.
The bottom paint color is Bison Brown and I love it. So much in fact, I am scheming to paint another room with it! As for the wall styling, would you believe me if I told you I did it all for under $20!
Let's take a closer look.....
Example A: Again with the typography. CAN'T. GET. ME. ENOUGH!
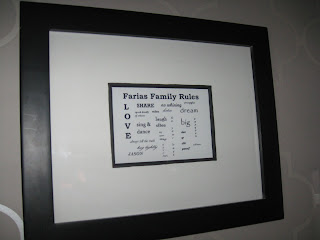
Personal typography for our family. "Farias Family Rules" done in Microsoft Word. I played with some different fonts and wrote words or phrases that define our family. Love, dream big, share, speak kindly of others.....and I placed all of our names in it as well. I printed it on medium weight card stock and placed it in a frame I found at the Christmas Tree Shop (this gal loves a bargain!). To create some definition with the matting, I used a black Sharpie marker and colored in the beveled edge of the mat. Simple!
Example B: Once again, the many uses of chalkboard paint!
I found chalkboard paint in Walmart for $3 and couldn't resist. I was trying to think where I wanted a chalkboard and with the amount left over, there will be other projects down the pipe. For now, I purchased a scalloped edge, pine wood placard ($1.99, Michael's Crafts) and painted the entire thing in the chalkboard paint. I "proofed" the board once it cured (24 hours) by chalking the entire thing and then wiping it clean. This helps later applications of chalk stick to the board. Lastly I nailed on a picture frame hook and... there you go!
Example C: Personal framed pictures.
Both pictures were framed with sale frames found at Target and the pictures.....well they were courtesy of our ultrasound technician. Both pictures were taken at 20 weeks of the boys. I cried with each boy when I saw their faces for the first time and these pictures bring back such awesome memories! (Side note, above this picture is an antique finial I found at an antiques show last weekend for $3.)
Example D: Homemade taxidermy!
Quasi-jumping on board with the taxidermy trend is my home spun take on it. I found this small bird and used a smaller wood placard ($0.99, Michael's Crafts) painted white. A little glue gun magic and I have a cute little pop off the wall!
I snagged the leaf plate and key (both bought in sets on sale from PB) from other places in the house to finish it off. I love it. It's glamorous. 'Nough said!
the non-art parts of selling art
3 hours ago


0 comments:
Post a Comment