Tuesday, March 29, 2011

Knock Off Lowe's Kitchen Chandelier

Greetings from the arctic air here in Moo Hampsha! It has been frigidly cold here for the past week.....as in don't go outside for extended periods of time type cold. Brrrrrr.....my teeth are chattering just staring out our window right now.

I have been searching the online universe for a light to hang in the dining nook of our kitchen. Since we are not "formal" dining room type people (maybe someday when the majority of our family doesn't eat with their hands and use mashed potatoes as hair gel), we eat every single meal in our kitchen. Therefore, I would like it to be a special place. The builder grade light that came with the house was so bright it was kind of septic......envision hospital or laboratory type lighting. Eeeeeeeekkkkk! Here it was.....soooooo past tense!


Nothing about it was anywhere near what I was envisioning. Then I saw this gorgeous light at Lowe's and thought...VOILA!

So I waited patiently and thought at some point, we can purchase it. Then as we realized we needed to transfer Bray to a big boy bed, I realized I could DIY this light by recycling his drum shade!

To start, I dismantled the light in the kitchen.


By removing the finial on the bottom, I very easily removed the glass. It was here that I realized there was not going to be an easy way to put the drum on, but never one to give up on a challenge I whipped out some wire cutters.


By making a small cut through the ring, I was able to slide the drum around the existing light. Next, I stripped off the fabric that was covering the drum.


I slid the drum onto the chandelier and began to measure to see how I was going to fit the bottom filter on. I soon realized that the interior rod (where the finial attached) extended further down than the filter would allow. Never fear.....I cut a small hole in the center of the filter and pushed the rod through. Next up, I reattached the finial as a decorative (and structural) piece!

Interior rod was way too long!

Created a tiny hole to push the rod through.

Lined up the finial.

Pushed the bottom filter into the drum shade.

Reattached the finial.
Lastly I added a little grosgrain ribbon to finish off the edges and give it a more polished look!

So much better than what was there and this version was free and that ALWAYS works in our budget! I have been seeing these drum shades at Goodwill lately. I think you could probably use this technique on a lot of different lights!

Thursday, March 24, 2011

Revamped Mirror

So excited to share this project with you....even though The Beast does not have a home yet. The future site of her permanent living arrangement will be in Bray's Big Boy Room (currently under construction....AGAIN.) In the meantime, I can at least show you how she came to be!

I really love the look of some of the distressed framed mirrors out there. Pottery Barn has quite a few that I occasionally torture myself by browsing through.....

Pottery Barn Aegean Mirror

In my attempt to see beauty where someone else may not, I spotted this (e-hem) lovely (?) find on craigslist not too long ago.


It was listed as a mirror that had been removed from a dresser. It was made out of particle board and looked very cheap in person. But......(you knew that was coming, didn't ya?) I liked the size of the mirror and figured on it being a great DIY project.

Soooooo the other night, armed with some scary looking tools, I pulled it out and started to take it apart. First thing that needed to go was the cheesy moulding on the top and bottom. It was sort of scalloped and looked like plastic.

Tapped (not gently) on the underside to lift the cross piece.

Next, jammed a flat head screw driver in there to create a space.

Moved across the top to loosen the moulding.

It popped off pretty easily (phew) and I moved on to removing all of the small brad nails that were sticking out.


After all was said and done, I was left with a piece of mirror glued onto a base of particle board......not very appealing. My first thought was to use some thick moulding and create a frame. Then I started reminiscing about the distressed frames I have been seeing drooling over.

Nekked!
Enter one interested and slightly amused Hubs to find me standing there in my slippers, staring at this with some serious concentration on my face. We started chit chatting on how I wanted it to look and after consulting our "scraps bucket".....we pulled some pieces and started laying them around the mirror to see what I liked.

Layering pieces of ripped down pine.

After describing what I "saw" for this mirror, the Hubs very patiently started layering wood with me until it started to come together.


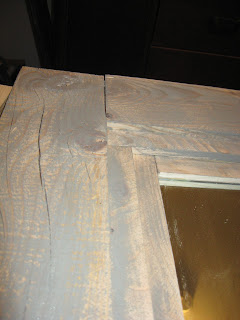
I was interested in a very raw look for the wood, so I purposefully chose "blemished" pieces. I think I am in love with the imperfections in this piece. After arranging and re-arranging, it looked perfect and we began gluing the base pieces. Layer by layer, we added a thick coat of Titebond beneath each piece of wood for extra strength and stability.


Once the last layer of wood was attached via glue, we went back over the entire piece with a small nailer to make double sure nothing was going to move!

The Hubs makes a great hand model, eh?
At last The Beast was looking pretty great, but like the Aegean mirror, I wanted that grayish, worn look to the wood. Enter a paint sample I picked up at the "2nd's Table" at Lowe's for $0.50 and a little leftover white trim paint....


In order to achieve the grainy effect, I wiped the excess paint off of the brush before applying it to the wood. Two light coats in this manner and I was left with The Beast exactly how I envisioned her!

Before


After


So for now she will rest comfortably in our walk in closet until she is hoisted onto the wall in Bray's room! Love it!

UPDATE! The Beast has finally made it into the new and improved Big Boy Room! Here she is!


Currently linking up with:

Chic on a Shoestring Decorating


Wednesday, March 23, 2011

Walk In Closet Upgrade

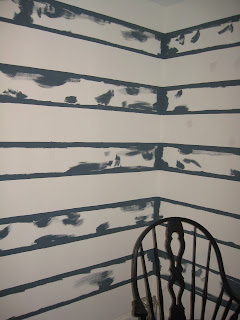
Well since I occasionally like to beat a dead horse, I really wanted to paint cabana stripes a la our laundry room in our master bedroom walk in closet. The walls were white and bare.....not really giving a good vibe to pick out your outfit for the day! Hence it too became one of those spaces that stayed behind closed doors most of the time. Following the same protocol as the laundry room, I penciled in the stripes and then cut them in by hand. Oh and like any good post, here are the hideous and slightly depressing before shots!

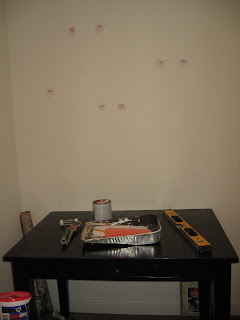
Patching holes from a previous attempt at shelves.

Eeeeekkkkkk!!
So after taking almost everything out and getting the stripes cut in, I was starting to feel a lot better.

My trusty "ladder" also known as a windsor chair.
I was able to get these steps done before bed time and I went blissfully off to sleep knowing that it was already an improvement!

The next day, to save time and my right arm, I decided to use a roller to fill in the spaces. About 25 minutes later and I was LOVING the effect!


I know some people might not trust their hand to cut in the lines, so I am passing on a piece of great advice from one of my readers Carrie! She said to use frog tape when painting lines. There is a special chemical in the tape that bonds it to the wall to prevent any paint from seeping under the tape when painting over it. (at least that is the basic gist of it!) THANKS CARRIE!!

Next up was adding a little flavah!! I needed it too look like another room, a simple extension of our bedroom. It needed to feel cozy.....but be a fun place to get ready in the morning! I started by hanging up my bags. Using leftover baseboard, I cut small sections, painted them brown and added a glass knob for sparkle. They make really cute hangers.


Next up, I decided to steal my son's dresser (don't worry he has two and I was contemplating moving one out of his room anyways). I placed my DIY Sunburst Mirror in there and love the way it is all piecing together....oh and did I mention I LOVE the extra storage!


I added in some pics of the fam because I love looking at those sweet faces first thing in the morning!


On the near wall, where the clothes hang, I am thinking of hanging a curtain from the ceiling to "hide" the wardrobe. Not sure yet, but this was a vast improvement to me.

This is what it currently looks like.....


Much neater and organized. Phew...big sigh of relief has commenced! Whadya think??

No Sew Kitchen Curtain

Good morning. The sun is shining. Everyone is healthy again! There is fresh snow on the ground.....ENTER RECORD SCREECHING.....yes, it snowed here. Just a measly few inches, but MAN did it throw me for a loop! I mean, we were celebrating the start of spring with weather in the high 60's this past weekend......Oh New England, you ole' sneak....So, my garden planting is back on hold for a little bit until we can see the ground again and I can set my stakes. More on that adventure later!

As for house projects, I finally got around to dressing the kitchen window. I have an idea of a window treatment that I want (also more on that later), but I was really needing something up there. I had extra fabric from the sheets I purchased to make my no sew Knock Off Pottery Barn drapes so I decided to make a small window treatment. I started by measuring out the window and deciding on a length. Once I had my measurements, I cut a piece of fabric of a twin flat bed sheet (purchased from Walmart, regularly $5, but I had a coupon). Using my trusty (sometimes you are too good to be true) fabric glue, I applied little dots along each edge and folded to fabric over to create a clean "seam" and rod pocket on the top of my fabric piece.

Creating a "seam".

Once it had dried I applied the same thin navy grosgrain along the edges as the PB knock offs.


At that point, I slid the curtain onto the tension rod I purchased. It was at this point that my brain started cranking and I was trying to figure out how I wanted it to hang. To eye ball it, I used some wooden clothespins to hold the fabric on the ends for the drape. And guess what.....I kind of liked the way it looked!

Going to live with it. Who knows, maybe this will stay. It's a little farmhouse and a little quirky, but it's super cute.


Related Posts Plugin for WordPress, Blogger...